Turquoise Pendent (Part 3 of 3)
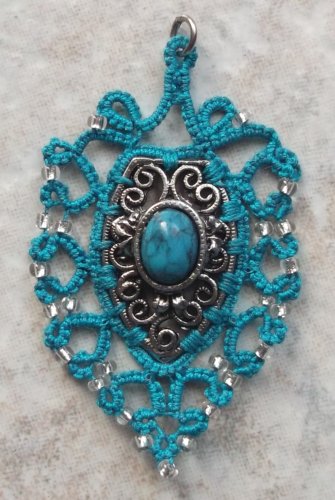
This is the final piece. I used a size 16 crochet hook for the beads, size 14 for the picot joins. Since I didn't start out with any picots, I used a stiff needle to slightly raise a picot between the desired DS.
Most of the rings were 3-3 and the most of the chains were 4-4. This piece looks great with two rows. You could also make a third row. Usually, I'll make the second row consisting of chains, first then the third row. Thumb through my previous post to get an idea, on how to proceed with your doo-dad. There is no written pattern for most doo-dads, which makes them so unique.
Once you are done tatting, block and stiffen you piece. I use hairspray (probably another no-no). It was always the old stand-by for drawings when Fixative wasn't in the budget. Next add your jump ring. I always add a small dab of fingernail polish where the ends of the jump ring meets to prevent fraying on the tatted part.
Another note: I don't like to add jump rings to picots!! I want my piece sturdy and a picot is a single strand on string...won't wear long. I prefer a sturdy tatted ring or chain to add my jump ring to. A good number of DS, in a ring is 12 DS.
Another great and interesting post, I love the way you have done this doodad, two rows is enough, a third might be over the top.
ReplyDeleteThank you for doing these posts you have given me a lot of interesting posts. I found a lovely piece in the market today that's crying out for tatting.
Margaret
Love the tips, and what you have done with this piece, I wasn't crazy about it till you fixed it :)
ReplyDeleteFabulous ornament! Thank you for the tutorial, i will start right a ay and show you the result
ReplyDeleteCan't wait to see!!
DeleteExcellent tutorial - very insightful! I like the way you raise the picots. Makes it so much easier to design as you go! Thanks for sharing all these tips!
ReplyDelete